Scotland 2016: Golf in East Lothian
September 7, 2016
As JK mentioned in his earlier post (Scotland 2016), his aim was to provide merely a taste of our experience in Scotland. An amuse-bouche of our adventure, if you will. In the remaining posts, we will endeavor to provide more complete reviews for each of the regions we visited: Glasgow, East Lothian, St. Andrew’s/Fife, and Carnoustie. For the more OCD readers, unfortunately these reviews will not appear in chronological order. We would apologize, but once they’re all written, you can just open different browser tabs and put them in order if you really need to. Another brief aside: for these reviews, we had to borrow more photos from the internet than we would typically like to, but the conditions were relatively poor for photography purposes during our visit. Thank you in advance, Google Images.
First up, East Lothian! (A map of our travels in East Lothian)
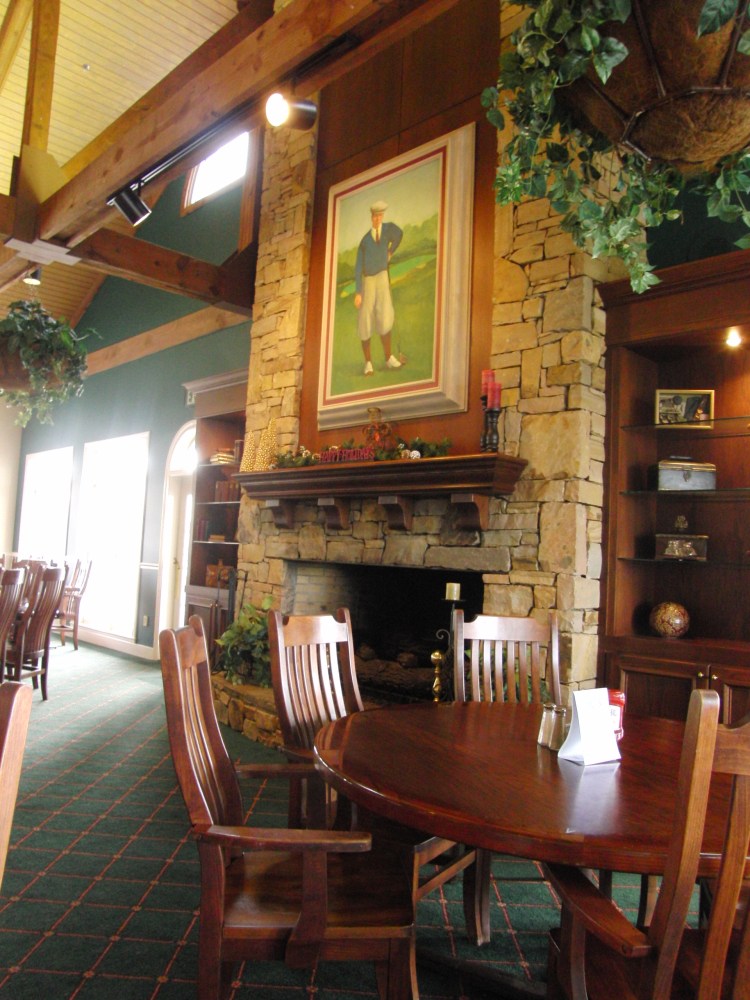
During our visit to East Lothian, JK and I stayed at a property called the County Hotel located just off the main drag in the town of North Berwick. We found the rooms using a combination of Google Maps, TripAdvisor, and Hotels.com. Mostly, we just wanted to find a place where we could do as little driving as possible, and the County Hotel fit the bill. Before I get into the course reviews, I want to mention that this place was a perfect place to start a golf trip not only because it was a good “golf” bnb, but also because it captured the feeling of golf in North Berwick. The rooms are basic, the beds comfortable, and the showers hot. There’s a fantastic pub downstairs that’s as likely to have a group of golfers visiting as locals from town. In fact, we met a group that was traveling from Wales on their own buddies golf trip. There was a distinct small town vibe and quirkiness that was absent in our other destinations that made North Berwick very special to us both.
North Berwick – The West Links
In a word, the West Links at North Berwick should be described as fun. It very well might have been the most fun course that JK and I played in Scotland together. At just over 6,100 yards from the tips, this par 71 layout does not require the player to hit extremely long drives to have scoring opportunities.

Panoramic view from the second hole at dusk
The course plays directly along the northernmost point of a peninsula that juts into the North Sea. This leads to some phenomenal views of island-like features and geological formations such as Bass Rock that border this area as captured above and below.

Bass Rock
While the front nine felt more like the typical links style golf we played in Scotland, the back nine took on a life of its own. The course had a number of features that were unique to the West links including a series of stone walls that run through the course:


These walls play as true hazards on at least two holes, with the most memorable being the par 4 13th “Pit” hole. This hole requires a well-placed drive up the right side of a narrow landing area, and then a cleanly nipped short iron or pitch over a 3-4 foot stone wall to a small green. Birdies must come at the price of one’s first child:

Photo borrowed from a Google Image search – it was raining when we played this hole, so cameras did not make an appearance.
Other memorable features included the original Redan par three that features an off-axis green that tilts away from the player (Read more about Redan holes here):

Also borrowed.
And finally, the most ridiculous green either JK or I have ever seen on the par 4 “Gate” 16th:

Also borrowed.
yes, that’s about a 6 foot drop right in the middle of the green, which effectively makes this a hole with alternate greens. JK made a nice birdie on this hole in some pretty questionable conditions.
Other memorable shots included the drive on 2 and the drive on 18. 2 felt very much like an inverse of 18 at pebble beach (slightly different scenery, but way better for a hook), while 18 felt almost like a copy of 18 from the Old Course.
JK and I agreed that if we were to do this trip again, we would try to schedule multiple rounds at the West Links not only to have another crack at some of these crazy holes, but also because the entire course seemed to have very high replay value. Even from morning to afternoon, these links must play very differently, and even a slight change in wind would impact club selection on some of the shorter holes.
Gullane #1
(Disclaimer: My review of Gullane #1 likely won’t do the course justice, but our round there had us chasing the sun and rushing in to drink a couple of beverages to warm up. I couldn’t imagine a more fun way to see a course quickly than the round we played there, but it doesn’t make for good review fodder. Clearly, a return trip is in order to fill out this review.)
During the afternoon of our first day in East Lothian, we were treated to a game at Gullane #1. This property actually has 3 courses, with number 1 being the most well known and the one we’d recommend playing if you only have time for one round at the facility.
JK and I were already both quite tired due to jet lag at this point, but did not want to miss out on the opportunity to play. Luckily, we were playing with two gents from the area and were able to settle on teams for a foursomes game. For those unfamiliar, foursomes is a team game where partners alternate shots on the same ball; four players will play two balls. Teams alternate tee shots regardless of who holes the last putt as well. If you are tired, but still want to see a course, or have limited daylight, or just want to play a fun new format, we highly recommend foursomes/alternate shot.
A quick look at the map (located here) will show the difference in the shape of overall layouts of Gullane and North Berwick. While NB is a more traditional out-and-back style links, Gullane is a sprawling property that has spectacular views of many holes and several prominences that offer spectacular views of the North Sea.

If North Berwick should be described as fun, Gullane #1 should be described as breathtaking.
The view of the second hole from the first tee was unlike anything else we saw in our 9 rounds:

Borrowed from golfnook.com/gullane.htm
The second hole itself might have been one of the hardest holes we played during our trip as well. In any event, the course continually offered wonderful challenges, long driving holes, and the need for a solid short game. More than almost any course during our trip, elevation change played a significant role in the course routing. The exception maybe Kingsbarns. It is not surprising that this course has hosted numerous championships in Scotland and is on the Scottish Open rota.

A view from the blue tee on the 13th hole – Hole Across (178 yards)
Kümmel

No. It’s not a golf course. Kümmel is the local drink in North Berwick/Muirfield. From what I can tell, it’s actually a German liquor, but 1/3 of the world’s supply is consumed in East Lothian. No one ever poured a single of this marvelous beverage, and we never questioned it. We highly recommend you drink the kümmel
Muirfield
Much ink has been spilled about Muirfield’s wonderful lunch, tradition of playing fourball in the morning and foursomes in the afternoon, and its recent vote not to allow female members, so I will focus on my opinions of the course and experience.
Let’s see. If North Berwick = Fun… and Gullane = Breathtaking … then it must be true that Muirfield = Prestigious.
Even walking up to the clubhouse (which one must do in coat and tie) inspires the distinct feeling of arriving at an exclusive private club which I have only experienced in the United States. As with all of the courses of that ilk that I have been lucky enough to play, Muirfield was in nearly perfect condition. The week after our visit the club was set to host the R&A’s Boys Amateur Championship. Accordingly, the course was being prepared and the rough was grown to a height that we did not experience anywhere else in Scotland. I don’t recall what happened with JK, but my bag left considerably lighter due to the lack of golf balls after our round.

View from the 3rd Fairway at Muirfield
As with most very private clubs, we limited the number of pictures we took and just enjoyed the experience. Muirfield is also known for playing rounds very quickly, so we didn’t want to spend a lot of time pulling phones out and being tourists.
The course was one of the finest we had an opportunity to play. Particular highlights included the par 4 3rd (pictured above) due to the fantastic second shot and the fact that I made birdie, the par 4 6th due to the incredibly difficult approach after a very tight drive, the par 5 9th (also made birdie), the par 4 11th due to the blind drive, the par 5 17th with its fantastic second shot and green complex (and my third birdie), and of course, the iconic par 4 18th where Phil won his Open Championship.
Odds and Ends
Other places we visited and liked in North Berwick included a wonderful pub called The Golfers Rest, the Turkish Kebab House three doors down from The Golfers Rest (second best meal we had in Scotland), and a San Francisco-style coffee shop called Steampunk Coffee from which I’m now regretting not buying a mug. There was also a beautiful cemetery behind the County Hotel that surrounds the ruin of an old church that JK and I had a chance to walk through one morning. It was quite an experience to see families have 6 or 7 generations buried in the same plot, with some predating the American Revolution.
Additionally, what we would call a “semi-golf” experience: right next to the West Links is a putting course that costs £2 per person. While neither of us would recommend playing this course directly prior to playing a round at the course due to the fact that it runs at roughly the speed of Congress deciding where to eat lunch, we would suggest it as a great place to settle wagers or enjoy a brew after a good day on the links. Also, thanks for the putter cover, JK!
Finally, if we had a chance to play more rounds in East Lothian, we would have considered Archerfield, Gullane #2, The Glen, and Craigielaw in that order. The order comes from no other rationale than the number of times we were told by others where we should play, and where the group of travelers from Wales I encountered at the County Hotel said they were playing.
Quick Review: Slaying the Tiger by Shane Ryan
June 15, 2015

Over the last few days, I’ve spent time here and there reading through a bit of Shane Ryan’s Slaying the Tiger. I picked it up after reading a short excerpt on http://www.golfwrx.com about the Masters and the membership at Augusta National Golf Club, and even though I’ve only managed to get through a couple of chapters, I don’t think there is a single golfer that follows the PGA TOUR at all that would not be fascinated by the stories in this book.
Ryan does an incredible job (thus far) of researching his subjects, creating a storyline that feels like it has progression, and telling the story in a way that is relatable to the average golfer. In short, he posits a more clear picture of life on TOUR than we get from your average Golf Channel broadcast and associated advertising.
From the book: “As the golf writer for Bill Simmons’s Grantland, Shane Ryan is the perfect herald for the sport’s new age. In Slaying the Tiger, he embeds himself for a season on the PGA Tour, where he finds the game far removed from the genteel rhythms of yesteryear. Instead, he discovers a group of mercurial talents driven to greatness by their fear of failure and their relentless perfectionism. From Augusta to Scotland, with an irreverent and energetic voice, Ryan documents every transcendent moment, every press tent tirade, and every controversy that made the 2014 Tour one of the most exciting and unpredictable in recent memory.
Here are indelibly drawn profiles of the game’s young guns: Rory McIlroy, the Northern Irish ace who stepped forward as the game’s next superstar; Patrick Reed, a brash, boastful competitor with a warrior’s mentality; Dustin Johnson, the brilliant natural talent whose private habits sabotage his potential; and Jason Day, a resilient Aussie whose hardscrabble beginnings make him the Tour’s ultimate longshot. Here also is the bumptious Bubba Watson, a devout Christian known for his unsportsmanlike outbursts on the golf course; Keegan Bradley, a flinty New Englander who plays with a colossal chip on his shoulder; twenty-one-year-old Jordan Spieth, a preternaturally mature Texan carrying the hopes of the golf establishment; and Rickie Fowler, the humble California kid striving to make his golf speak louder than his bright orange clothes.”
Pick it up today for only $11.84 on your Kindle (or your iPhone) at Amazon: http://www.amazon.com/Slaying-Tiger-Year-Inside-Ropes-ebook/dp/B00N6PD1WK/ref=tmm_kin_swatch_0?_encoding=UTF8&sr=8-1&qid=1434414898.
Review: Leather Scorecard Wallets
November 15, 2012
Generally, we here at the PF find golf “accessories” to be unnecessary. We all know “that guy” at the range with the staff bag and matching “tour” uniform (complete with white belt). On the other end of the spectrum, there is “that guy” with everything including sharpie, bag tags, ball cleaner, towels, beer dispenser, groove sharpener,ball retriever, cigar holder, portable disco ball, and stereo system dangling from his 14-way cart bag that it looks like a Christmas tree. I say this, and look over at my own bag with a towel, bag tag, and brush hanging off the side… In any event, there is one “accessory,” however, that never seems out of place. We see the pros using them on TV every day, but really don’t think twice about it until we wish we had it. The scorecard holder.

Today, we review a golf necessity that truly stands the test of time and is worthy of any true golfer’s bag – Stanley Mayhem Scorecard Wallets.

Greg, the designer and manufacturer of these beautiful wallets, makes a wonderful product. Above is an example of one of a pair of custom-designed scorecard wallets that he worked with me on in record-breaking time. I must say, he was was great to work with. He took my totally unreasonable request to make these wallets in a half his usual time and made it a reality. A quick story: I had planned a trip to ATL to spend some time with JK and play a course (to review for this blog). I wanted to have these wallets as a thank you for getting us out to the course, but the plan eventually fell through. In any event, Greg was very accommodating and had the wallets in my hands prior to when I was scheduled to leave for ATL.

This picture is a little darker, but I wanted show the depth of the color of the dye used in this wallet. It is a very rich dark brown color. The letters on the bottom are “PF” for this blog. This particular model is called the “storyteller.” Other models include multiple pockets, custom insignia, and other amenities. I just wanted a basic model that used elastic, had a pencil holder, and provided a solid writing surface. The interior pocket on the flap is nice a nice bonus; I use it for holding my NCGA cards and a small amount of cash for on-course refreshments :).

Greg was nice enough to add a customization to the interior pocket – the two turtles. This was a shout-out to JK for something he said one of the first time we played a round of golf together as summer associates.
Another example taken from Greg’s catalogue: The Nettle:


Other options include choice of colors of leather: Bison Brown, Charcoal Black, Scarlet Red, Forest Green, Deep Blue, Sunset Orange, Natural, and Deep Purple. Greg notes that each wallet is dyed three times and sealed to prevent leeching of the dye onto clothing. He cautions that the wallet should not be used in light colored clothing the first few times that you use it, but I never had an issue with leeching.
Once you make the very difficult decision to forego picking up a belt from Greg as well, he makes the process very easy. Send him an email (greg.dibble@yahoo.com) with your idea and he’ll draw up an electronic design for you. You make any changes, and wait until Greg hand makes your custom design. Once your design is complete, Greg packages it up (very nicely, i might add) and ships it off to you. It’s that simple.

Total cost for 2 custom-designed PowerFade golf wallets – $160. Look no further for true golf luxury and craftsmanship. I have used this wallet since about April and will never use anything else. It has worn in well and only looks better with time. To get your own, get in touch with Greg:
greg.dibble@yahoo.com
Review: Lie Fitting with Brian Razzari
July 10, 2012
Last week, JK and I had a talk about possible ways to help me improve my ability to hit greens in regulation. At that time, I was hitting my irons crisply and to consistent distances, but was still having problems controlling trajectory. This resulted in a lot of greens missed but with the ball pin high a few yards off-line. My problem was becoming more pronounced in the windy conditions I typically face in Northern California. After shooting a career round the previous Saturday, I sat down and evaluated my round. Of the 8 greens I missed, 5 were missed left, two long, and two short. The three misses to the right were with wedges, or were from the left rough. My miss, clearly, is left. On windy days, the little draw I have become accustomed turns into something between a hook and a duck hook.
JK suggested that, because my ballstriking with my short clubs needs to improve if I hope to keep shooting in the 70’s, I should take my clubs and have the lie angles checked. For a little background, the lie angle is the angle formed between the ground and the club shaft when the club is properly soled:

Like most things in golf, a small change in equipment specifications can result in significant changes in shot shape and distance. For example, changing a driver’s loft from 9.5 degrees to 10.5 degrees can significantly raise trajectory, increase carry, and decrease roll-out for a given player. The total distance change may not be significant, but it may improve the golfer’s chances of clearing that forced carry their 9.5 degree driver was not making. The changes to shot shape caused by flaws in lie angle are even more pronounced:

As shown, if the club is too “upright,” that is, the lie angle is such that the toe of the club is raised relative to the heel, the player will tend to miss left (left side of image). This makes sense because if the heel of the club is lower than the toe, it will make contact with the ground before the toe, causing the head to close through impact. If the club is too “flat,” that is, the heel of the club is raised relative to the toe, the player will tend to miss right (right side of image). This also makes sense because if the toe makes contact with the ground before the heel, it will tend to be dragged behind the heel and push the ball to the right. When the club is properly soled, it gives the golfer the best chance for making solid contact and hitting a straight shot. Small differences can be huge. For some reference, the total amount of variation in lie angle for any clubs is about 4 degrees flat to 4 degrees upright.
With all of this knowledge in mind, I decided to get the lie angles checked on my irons by a competent professional. My first stop was a big box store in San Jose. As is custom for fittings in such a store, the bottom of my club was taped up with tape that shows where contact was made with the ground. A plastic lie board was setup with a ball, and I hit a series of shots to determine what part of the club was making contact with the ground. So far, so good. Once we had determined that the lie angles on my clubs were too upright for me, the “clubmaker” at this store took one look at the results from one club and said all of my clubs needed to be bent “at least one degree.” The big box store also wanted to charge me $5.99 per club to have them bent. I’d need to leave my clubs with them for a week as well to have this process performed. If the clubs were not right when I got them back, I’d have to tell them what adjustment was necessary and wait another week. Thanks, guys, but I’ll go somewhere else.
Enter Brian Razzari. I called the Brad Lozares Golf Shop at the Palo Alto Municipal Golf Course on my way home from San Jose. I should have called here first because I was looking for someone that actually knew what he or she was doing. Upon answering, Brian was completely accommodating of my ridiculous request to come in within the next 30 minutes to have a lie fitting performed. He quoted me the very reasonable price of $50 to have the lie angles on each and every one of my irons and wedges (10 clubs total) adjusted based on a dynamic fitting he would perform at the driving range. He would watch me hit a few shots, take the club, bend it, and watch me hit more shots to determine the correct lie angle for each club. This is tour-level fitting, people. Brian also checked the lofts on each of my irons to make sure they were consistent. I also learned that Brian is a certified Titleist club fitter. He knows my AP2s better than most in the Bay Area. After about 45 minutes of hitting balls and bending clubs, Brian informed me that he bent my irons 2 degrees flat, wedges 1 degree flat, and did not adjust my 60* wedge at all because the sole already showed that it was at the correct lie angle for my swing.
I am not sure I can say enough good things about the experience with Brian, but if you are interested in making your game better, I highly recommend getting your clubs fitted to your swing so that you don’t start making compensations in your swing to make up for an incorrect lie angle. If you are in the Bay Area, I highly recommend a trip to Palo Alto Muni to visit Brian Razzari if you want a tour-level fitting experience for a reasonable price.
Palo Alto Muni: http://www.bradlozaresgolfshop.com/ or call 650-856-0881 and ask for Brian.
In yet another joint post, LG and I review a place near and dear to both our hearts, the Robert Trent Jones Golf Trail–specifically, the course at Oxmoor Valley. Nearly two years ago now (Summer 2010), LG and I visited the RTJ Golf Trail for a 3-day trip through Alabama to play three sites of one of the most fun golf experiences in the Southeast, the Robert Trent Jones Golf Trail (see www.rtjgolf.com) (Note: given that this was our second trip, the photos below will show the course at two different times). Although there are a number of trips in the Southeast that I am looking forward to taking some day (Pinehurst and Sawgrass to name a few), the RTJ golf trail is both reasonably priced and easily accessible (relatively) for both LG (who has relatives in Mississippi) and me (Atlanta)–in particular, the courses in Birmingham, AL.
Oxmoor Valley is one of two RTJ sites in Birmingham, the other being the Ross Bridge course. However, we have not played the Ross Bridge course because it is easily 3x the cost of playing the Oxmoor Valley, and, although we’re fanatical about golf, unnecessary cost doesn’t equate to greater value.
As previously mentioned, LG and I have visited multiple RTJ sites. For the price, there is little that is comparable to RTJ courses. For those that don’t know, Robert Trent Jones designed golf courses are typically long, undulating, and punshing while maintaining an understated elegance and natural beauty. 430+ yard par 4s and 3-teired greens are just some of the common elements of an RTJ course. But when he gets a hold of an excellent piece of real estate–as he’s done throughout Alabama–RTJ manages to produce excellent golf. And the courses are well-maintained, even in the winter and the dog days of summer.
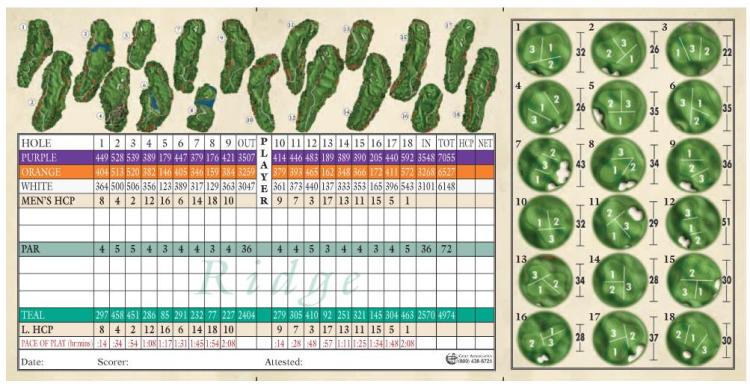
What’s more, most RTJ sites include multiple golf courses in one site. Oxmoor Valley includes 36 holes of full-length golf and a par-3 “short course” that provides an excellent challenge. When LG and I visited the RTJ course several years ago, we opted to play the Ridge course and the Valley course in the same day. Halfway through the Valley course, we left and went back to the Ridge.
I have played about 130 holes of RTJ Trail golf (27 at Silver Lakes, 45 at Capitol Hill, 27 at Oxmoor, and 30-ish at Grand National, not counting short courses), and the Ridge course at Oxmoor Valley may be my favorite of all.
First, the clubhouses at all RTJ Courses are large and inviting lodge-type atmospheres, complete with full restaurants that serve very good meals to hungry patrons. The structures are adorned with memoirs of the great times one has playing golf and reminders of the history of the game.

A view from the first green back toward the tee at the Ridge course gives a great idea of what lies ahead. Rolling hills, meandering tree lines, green fairways, and precise layouts make shotmaking in critical demand for a good score. The visual obstructions often make tee shots intimidating experiences, seeing how many places one can miss the fairway. Still, little matches the natural beauty of a well-planned golf course, and RTJ has plenty of that.

Yet another indicator of the beauty of this course is seen at the par 5 3rd hole. A brave driver can place his ball in the fairway between the water.

Even if you manage to hit a career drive, RTJ leaves very little payoff. The uphill second shot to a pedestal green is an unlikely reach, even for the longest and most precise hitter.

What might be the signature hole of this course, the par 3 8th, is downhill and all carry over water. A nicely hit 7 or 8 iron (depending on pin location) will put you in a good spot for a birdie. A quick story from LG here: We have had two chances to play this hole in our time. During our first trip, the pin was located in the back right section of this green, and during our second, it was located in the front left location. During both trips, JK somehow managed to stick his ball in a position to have the longest putt imaginable on this green. I think he would have had about 5 feet of putts total left had the pins been swapped. I, on the other hand, have played this hole in even par for my career thanks to two nicely placed shots that left me a grand total of about 25 feet of putts on this green in two rounds. The closeup of the green below allows you to see this for yourself. Now back to JK.

As my memory serves, I don’t recall thinking this course was very long. Yet, at over 7,000 yards from the tips, no one can call it a short course. I suppose I was too focused on other features of the course to worry about the length.
Although I haven’t seemed to play well, I can’t blame the course at all for that.
Quick aside from LG: JK might not be able to blame the course, but I’ll definitely throw in a complaint. RTJ designs a hard golf course. I love them and would love to have one be my home course some day, but man, they can kick your tail. A quick example is the dastardly par-4 6th below.

The dogleg left hole measures 447 yards from the tips and requires a massive carry over a ravine. The more that I think about this behemoth, the less terrible I feel about making a quadruple bogey 8 on it during our last outing. The carry must be long and precise. The fairway slopes left toward the ravine and it is impossible to tell from the tee where the fairway comes out to save an errant ball. Moreover, the ravine cuts across the hole and makes any approach from the right rough a tall order. Oh, and even if you hit that monster drive, heaven help you if you have anything longer than a 7 iron in because this three tiered green demands a high, soft shot to get within range. Missing the green on any side, long, or short will provide a daunting up and down. My advice: play this hole as a par 5, or hope that your karma is better than mine. In two rounds, I am collectively 7 over on this hole alone. Now back to JK.
The drawbacks–it’s hard to say. The courses are not really walkable not only because of undulation but also because there is a lot of distance between greens and tees. They are typically out in the middle of nowhere, but Birmingham wasn’t bad at all. Not to mention, when you’re golfing, you typically don’t want to be in an urban center. The service is great. The cost is reasonable ($52/18 holes with cart).
One thing, you may want to check and ensure that maintenance is not being done during your trip. LG and I had planned to play one RTJ course during our 3-day visit that we skipped because it was being aerated during our visit. Thankfully, we checked when we called ahead–not sure they would’ve told us if we hadn’t asked.
All in all, though, it’s a great place to play golf.
Value: 8/10
Condition/Maintenance: 8/10
Price: 8/10
Layout: 9/10
Challenge: 8/10
Overall: 8/10
PS, LG and I also STRONGLY recommend a trip to Saw’s BBQ after the round. Unbelievably good, if you like good BBQ: 1008 Oxmoor Rd, Birmingham, AL | (205) 879-1937 | sawsbbq.com
This post follows up on the Caswell Stainless Blackener post found at https://thepowerfade.wordpress.com/2012/01/03/restoration-and-review-caswell-stainless-blackener/ and on the Club Repair post found at https://thepowerfade.wordpress.com/2011/12/12/club-repair-restoring-a-putter-part-1/.
I decided that, although the Caswell was helpful, it was not perfect. Thus, I went ahead and smoothed out the dings. I used a flat file to take out the big dings (if you decide to do this, you must be very careful wit the flat file–it can do a lot of damage). Then, progressive sanding with 60 grit, 180 grit, and then 400 grit sandpaper smoothed out most of the dings. In some cases, I did have to go back with the 60 grit because the scratches with the flat file were very evident. Even then, I still haven’t totally gotten all of the marks off of it.
The reason I did not go beyond 400 grit in this case is twofold: first, I didn’t have the time to get everything perfect and make a mirror shine. The several dings that are there would be much more evident if the rest of the putter were mirror finished; second, I wanted to keep the mill marks on the face, which meant no sanding of the face of the putter. I reasoned that, if I didn’t go beyond 400 grit, the face wouldn’t look too far off from the rest of the putter (since I don’t have a bead blasting cabinet). The process and results are below.
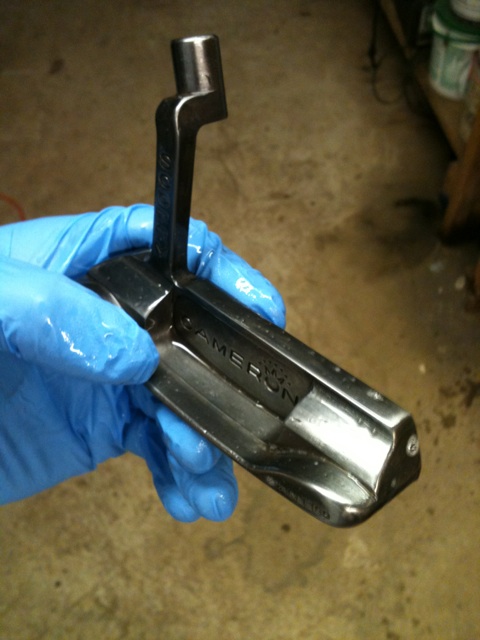
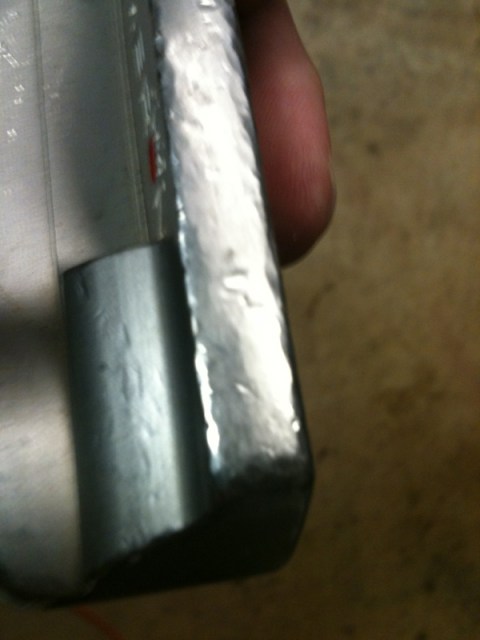
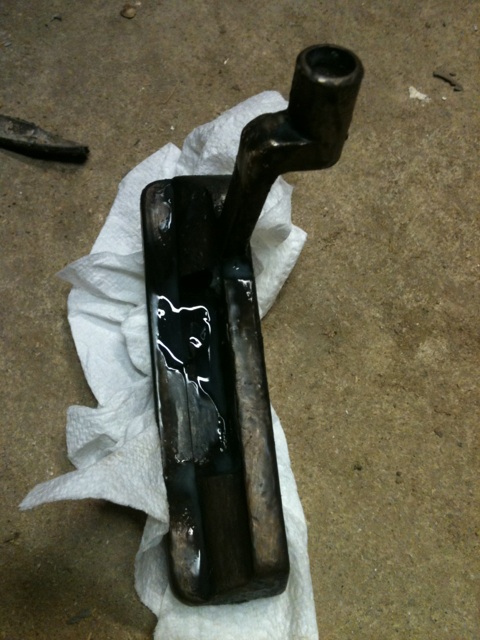
Here is the head before significant sanding. You can see that the blackener worked well before. Part of the sanding will help me take off that blackened finish.
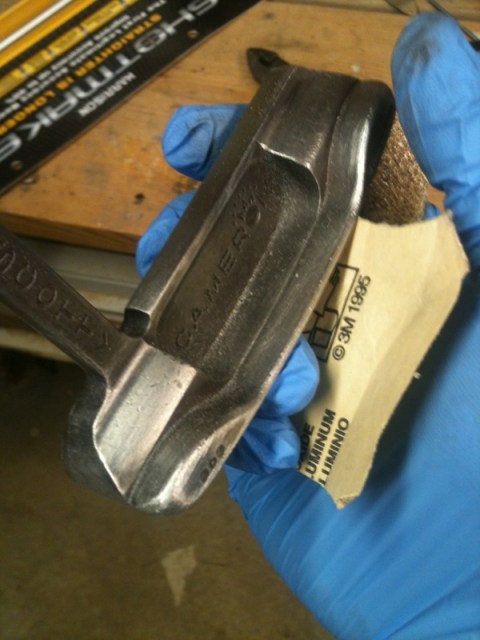

When the sole is partially sanded and partially blackened, it’s easy to see where the dings are. Ouch!

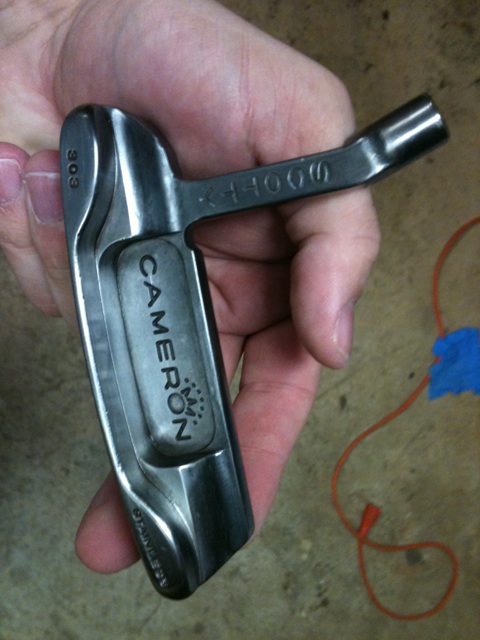
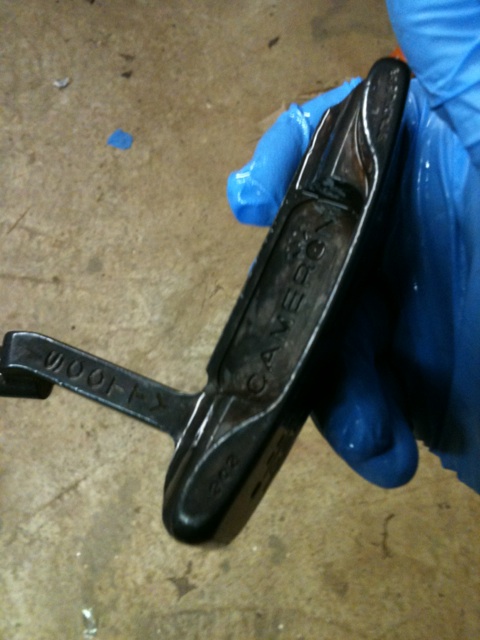
I’m staying away from the face as much as possible. The dings on the top line are hard to deal with when doing this because you can’t easily smooth them out without affecting the mill marks. I’ll do my best.

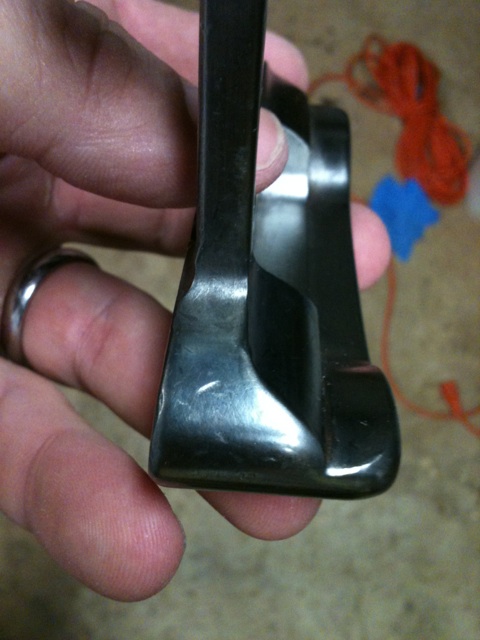
See how much smoother the heel is now that it’s been filed and 60-gritted?
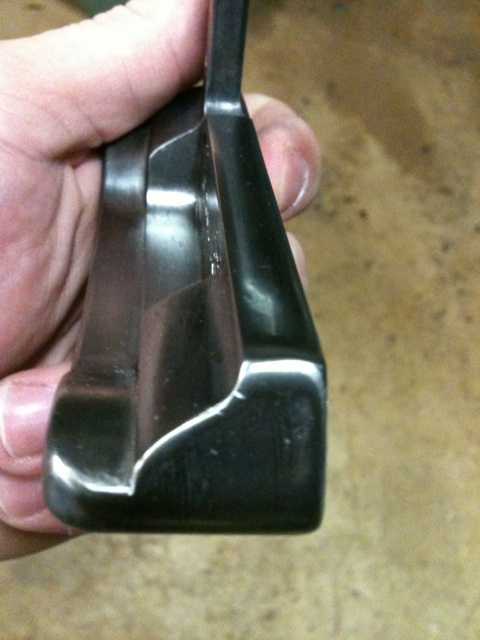
The top line looks 1000x better now.

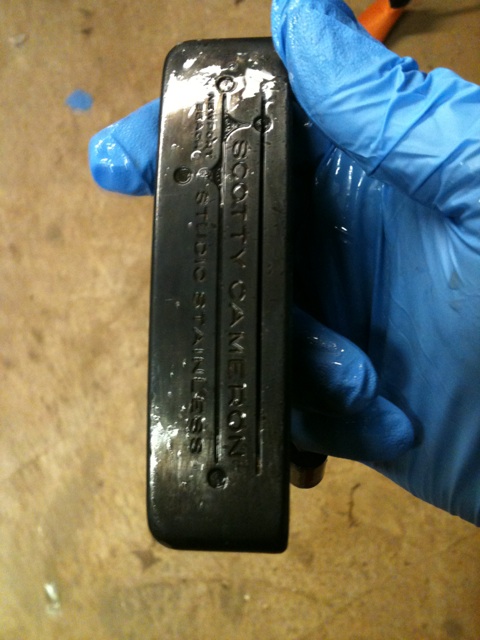
And now, after complete sanding with progressive grits, you can see there is a little shine to the head, but not like the mirror finish in other posts (see https://thepowerfade.wordpress.com/2011/12/12/club-repair-restoring-a-putter-part-1/)


I’ve cleaned up the face just a bit with 400 grit paper to help the blackener stay smooth.

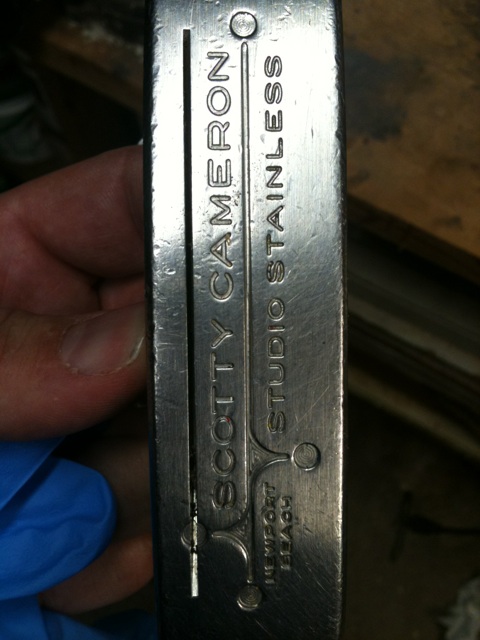
Here’s the final top line. Looks a lot better

Blackening was virtually the same process. This time, I used much less blackening paste and it worked out about the same, so conserve that stuff. It aint cheap.
I worked the blackener around with a GLOVED HAND (wear a glove, or your hands will really stink) to smooth it out. When the blackening was about even and had been on for a minute or so, I quenched it in a bucket of cold water and rubbed all of the paste off. Then I smoothed out the blackener by rubbing any uneven spots with steel wool. The result looks pretty good. (The wet looking photos have the sealer applied).


Altogether, not too bad. Here’s the final product:

Adding a little paint fill (there’s still more to go)

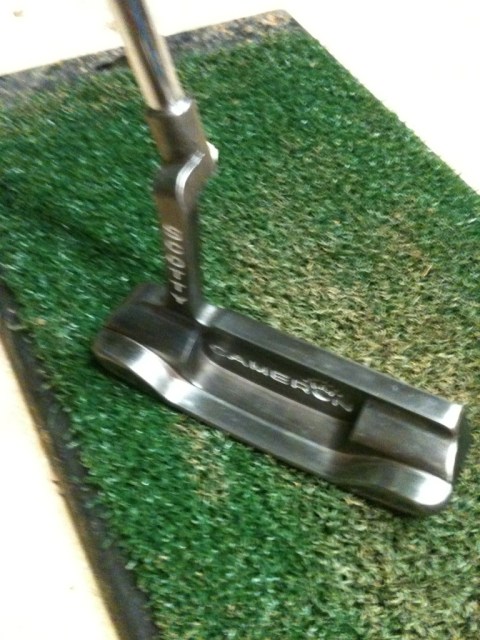
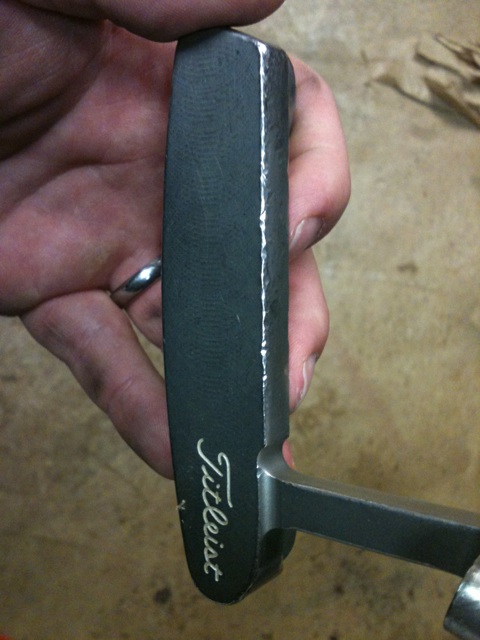
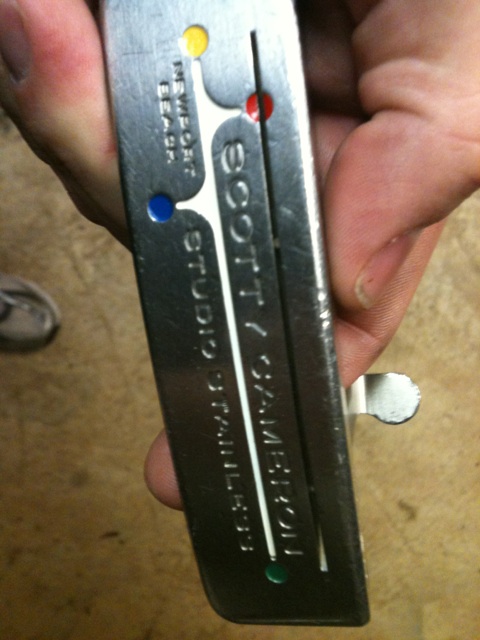
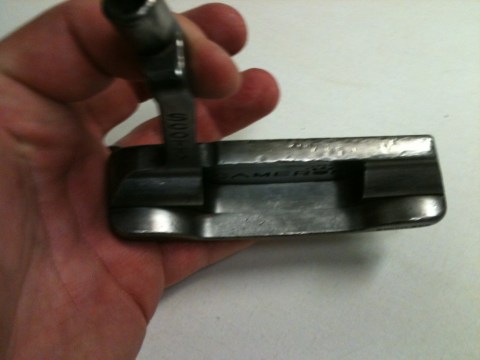
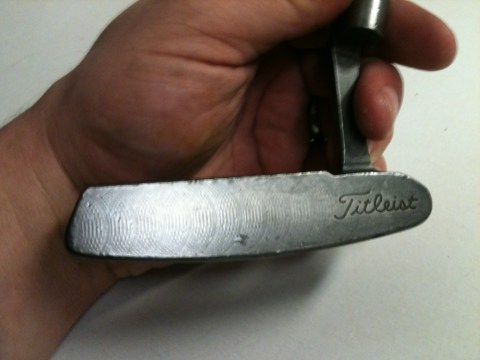
The color is kind of hard to see in the photos. Here’s a comparison to my stock Newport Beach.

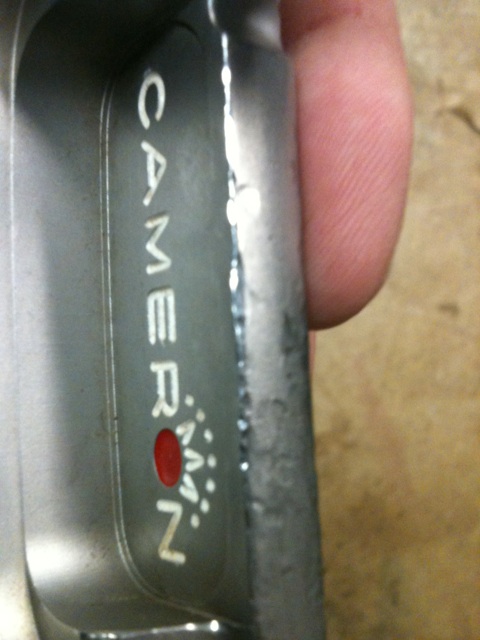
Restoration and Review: Caswell Stainless Blackener
January 3, 2012
This post is a restoration of a Scotty Cameron Newport Beach that has seen better days. The purpose of this is to review Caswell’s Stainless Blackener product.
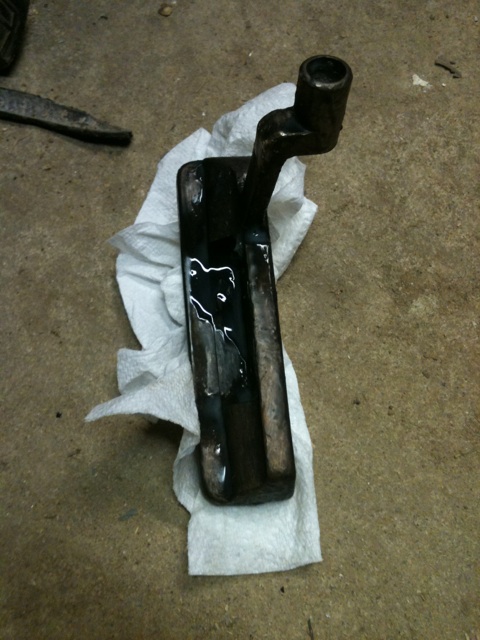
The putter is seen in the photos below before restoration.


As you can see, it’s had a rough time. I’m hoping to show that it’s possible to make a putter look better simply by blackening the finish. I’m not sure what I’ll get here.
The first step is to remove all of the paint fill. Don’t mess around with acetone, as it can take awhile. Instead, as LG noted in his post on removing paint fill from irons (see https://thepowerfade.wordpress.com/2010/12/17/quick-tip-new-life-for-old-irons/), automotive paint stripper works very well and very quickly with little work.
The process of putting the blackening on can be done several different ways. This blackener is gel. Once the blackener is applied, a sealant is used. Both are included with the kit:

First, you must clean the steel with water. Soap would probably help. The instructions say “clean until it passes a water break test.” Essentially, clean it until water flows over it evenly, without breaking.
The blackener is applied by simply placing on the putter and allowing it to work. I found that it worked best for me if I used a gloved hand (VERY IMPORTANT OR YOUR HANDS WILL STINK LIKE CRAZY) and continuously rubbed it around. This process helped get a little more even coating.


When finished, rinse with water and apply the sealant.

Once the sealant is applied, the putter is virtually done. Clean it up with water and take photos


This process was remarkably easy. Although it didn’t turn out as well as some of the professionally blackened putters, it nonetheless has real potential to turn out that way if continuously applied. A few more applications and I’m certain it would be nice and dark.
I got this kit second hand for $25. I believe they’re around $40 new, but there is enough to do a number of putters if you chose to.
As for results, well, it doesn’t look perfect. And, as I often find with putter finishing, the better-prepped the surface, the better the finish looks. For example, on this putter, the sole turned out the best with a nice dark, even color. However, it does look better than it used to, and it did give me a chance to play around with this stuff. I’ll do some restoration work, take the dings out, and then re-blacken it in the future.
Cost: 6
Value: 7
Ease of Use: 8
Finish: 8
Overall: 8
We’ll see how it turns out once the full restoration and ding removal happens. I’m sure it would probably give me a much more favorable opinion on this product.
Review: Iron Factory (Jim Kronus)
December 28, 2011
Anyone who reads the PF regularly knows how LG and I feel about our golf equipment–utterly superstitious. Inexplicably, we feel a connection to certain equipment that gives us more confidence. Whether it’s good balls numbered 7 or fairway woods that are 7 years old, LG and I have the things we each like.
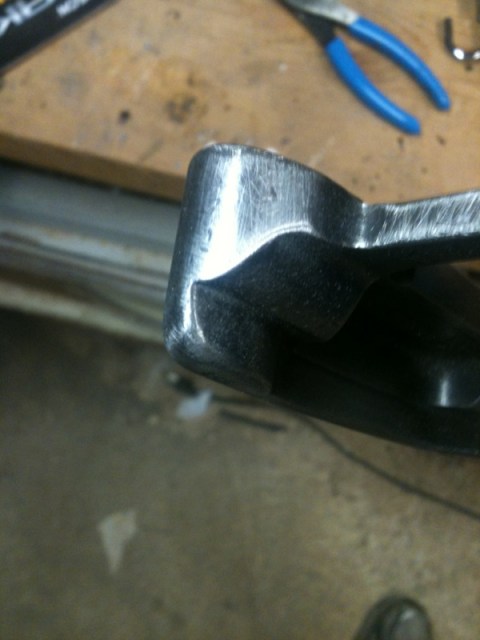
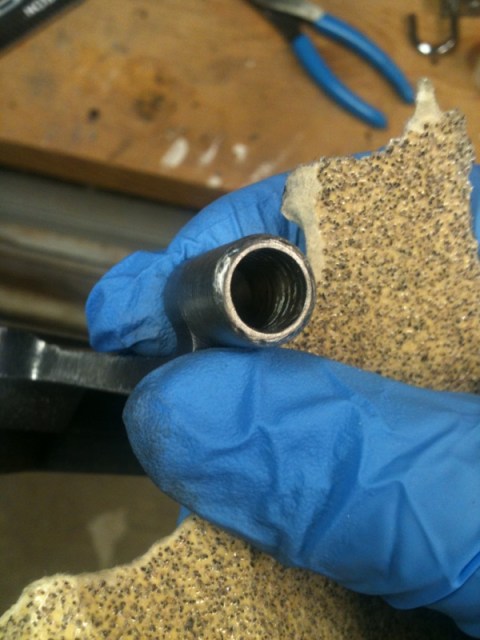
For me, once I find something I like, I tend to stick with it. In accord with that, I REALLY like my wedges. I have figured out how to set them up correctly for me and my touch. The only problem is that I’ve basically worn them out. See photos below.


In accord with it, I looked at replacing them. However, I got such a good deal on them, there’s no way I could afford $190/head to replace them new (see http://www.fourteengolf.com/product/detail.shtml?P=53 and http://www.tourspecgolf.com/Fourteen-2010-MT-28-V5-Forged-Wedge). Them, I found out about rechroming.
Several places do it, but for price and quality (based on reviews), I chose to use The Iron Factory (http://www.theironfactory.com/) and well-known iron restoration specialist Jim Kronus. Kronus provided chroming services to many OEMs years ago but now provides services for orders as small as $30. When I contacted his business, I got a personal call from the man himself to discuss my order and to answer my questions on the process.
Placing an order is as simple as providing a letter stating what you want Jim to do, putting the heads in a box (small flat-rate box from the post office is $5.00), and sending them away to the address on The Iron Factory website. When the heads arrive, Jim will call you personally to confirm your order, take your credit card information, and answer any questions you may have. We discussed the need for the grooves to remain conforming to the new 2010 groove rule, and he informed me of some ways he could make it happen.
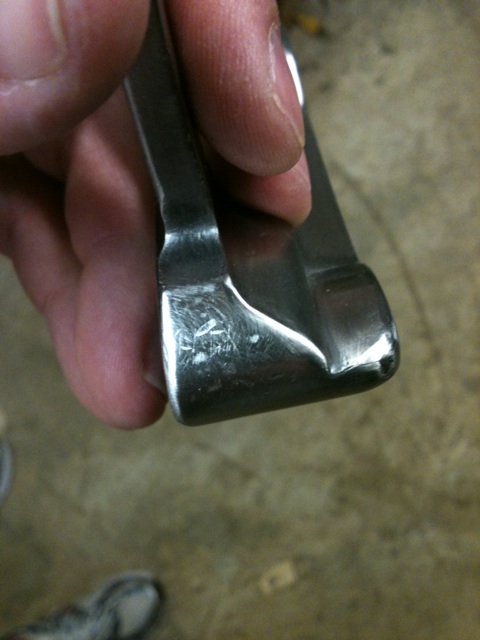
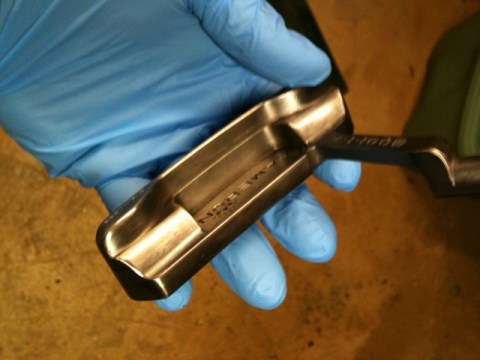
About a week and a half later, I received my rechromed wedge heads, as shown below:
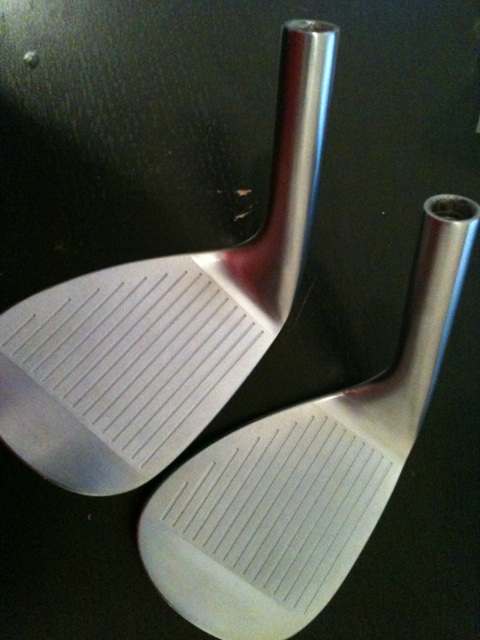

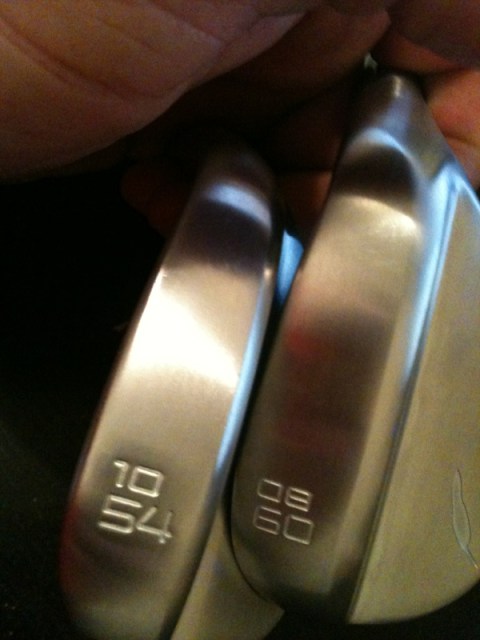


Yes, those are the same clubs. I couldn’t believe it. Jim did a fantastic job. Not only do they grind out all of the dings and dents to make the soles smooth again, Jim adds back the requisite chrome to keep the head weight the same as when they came in.
Drawbacks, they weren’t super cheap, but they weren’t expensive either. At $38/head to regroove, restore, and rechrome (shipping included), I can’t really complain. I will say that I believe I asked at one point for bright chrome and I believe I received satin chrome, but I am not concerned: these look great, and bright chrome may been a bit too reflective for wedges. The last thing is that Jim sends all his orders out with signature confirmation. Since I wasn’t there to sign for the box, I had to go to the post office to get my box, which was a hassel given that it’s nearly Christmas.
However, the communication was great, and the final product was beautiful at a reasonable price. I’m very happy, and I’m looking forward to getting out there with these.
Price: 7
Value: 9
Communication: 9
Customer Service: 7
Quality: 9
Overall: 8
Review: Black Oxide Service (BOSgolf.com)
December 19, 2011
Today I review Black Oxide Service, provider of metal finishing services. bosgolf.com
BOS is well-known in the golf industry–particularly in the putter world–for their outstanding finishing of some of the best-looking clubs in the game. BOS is responsible for the finish of Scotty Cameron’s original Gun Blue Classics line of putters, the line that put Cameron on the map. BOS also has worked on Scratch clubs recently, providing some special finishes for their wedges.
After tinkering around with the idea of refinishing/reworking clubs myself, I got in touch with BOS to clean up some Cameron putters for me. Consistent readers will know that I restored a Cameron TeI3 putter (see https://thepowerfade.wordpress.com/2011/03/16/restoring-a-tei3-long-neck/) but was unhappy with the cold-blue finish, even after several tries to get it right. Although I learned a lot from the restoration process, I decided I wanted something unique, so I sent my putter to BOS for their “Aquamarine” finish, a green-blue hued finish.
Coincidentally, I was able to pick up a Cameron Newport Oil Can putter for a good price. Although the putter did not need much work to repair dings or dents, its finished had been stripped because–according to the prior owner–“it had been left in a garage and was all rusty, so some stuff was put on it to take the rust off.”
Below is what the Newport Oil Can looked like before sending to BOS. Look at the post on restoring the TeI3 (here: https://thepowerfade.wordpress.com/2011/03/16/restoring-a-tei3-long-neck/)for photos as to what that putter looked like before.


The result was utterly stunning:


Refinishes from BOS are not cheap (see http://www.bosgolf.com/finishes.html) However, if you can find an old Scotty Cameron putter for a good price, they can be a cost-effective alternative to the Cameron Custom Shop and can even allow you the ability to customize the finishes yourself–putting something like Aquamarine on a Cameron putter would never be allowed from the Custom Shop. Further, if you just wanted a nice putter that was basically new but didn’t want to spend the $300 for a new Cameron or much more for an old one in good shape, a refinish by BOS can be a great way to get that putter of your dreams for a fraction of the price.
BOS’s customer service was great as well. For the TeI3, some of the finish peeled off. BOS repaired the problem at no charge, and it looks good as new.
Downsides, the cost is pretty high. They refuse to ship anything other than UPS, so shipping is $17.50 for a single putter head (yikes!). But their customer service is fantastic, and although some have complained of long lead times, they got my putters back to me in just a few weeks.
Price: 4
Quality: 8
Turnaround: 7
Customization: 8
Customer Service: 9
Ovarall: 7
Review: Club Covers by DelilaH
December 7, 2011
Today’s review focuses on a niche in the golf industry: customization. In this case, custom club covers.
That’s right, I said custom golf club covers. Although it sounds over the top, many golfers like to customize their bag. Your clubs should fit you like a glove–lofts, lies, grips, shafts, and more. Customizing the appearance of your clubs is an extra step many golfers take to stand out and to put their own personal stamps on the game they love. For example, looking at LG’s bag, he even has his own custom ferrules (see https://thepowerfade.wordpress.com/2011/07/01/whats-in-the-bag-lg-edition/ for LG’s custom blue ferrules, seen best on the photo of his wedges). And, would Tiger really have been as great without his notable friend, Frank?
Personally, I haven’t ever believed that I had a good enough game to customize my own bag–and, quite frankly, I didn’t have a good enough bank account. However, this year, I’ve settled into my equipment, and, as a Christmas gift to myself, I decided it was time to customize my golf bag. Having just had my second child, a custom club cover dedicated to my two children was what I wanted.
The first thing I needed to do was find someone who could make it. For that, I can tell you–look no further than DelilaH at GirlyGolfer (http://www.girlygolfer.com/CLUB%20COVERS%20MEN.html).
I emailed the contact information on the website stating I had an idea and wanted to make a cover dedicated to my children. Delila responded in no less than a week–starting with an apology for how long it had taken to get back to me!
Delila (the H is for her last name) contacted me asking whether I had a specific idea, which I did not. I pointed out a few things I thought would be important for a personal cover: (a) I wanted yellow to match my bag, which is generally yellow in honor of my alma mater, Georgia Tech; and (b) I wanted an elephant and a giraffe somewhere on the cover because those animals signify my two children. Maybe I would add my initials, but it wasn’t required. Within two days, Delila was back to me with three different design options with various pricing. After about a day of deliberation, I picked one of the options and offered a few tweaks.
Delila sent me an invoice which I paid the following morning. By the evening, I received the following picture of my completed club cover:

She boxed it for shipping that night, and I had it two days later.
Soup to nuts, from the “hey, I think I’ll get a custom club cover” to having the finished product in my hand it took Delila 10 days, and she was apologetic that it took as long as it did!
All of my reviews have a drawbacks section to highlight at least one thing I did not like about the process, the course, the application, whatever. The only thing I can say was a drawback was cost. As with any customization, the cost will not be a bargain. The custom cover shown above was $70 shipped ($64 for the cover + $6 shipping). However, Delila did an excellent job conceiving the design, making it, and putting it together, and it is an extremely high quality cover. I cannot complain about $70 for all of that work that she did. Some of the seams are not 100% straight and aligned, but I expected some variation as the covers are sewn, not mass-produced, and the small “imperfections” that might bother some purchasers give it the custom-made look that I prefer.
Altogether, I got EXACTLY what I wanted: a custom-made cover that is exactly my style and is the perfect accent to my golf bag (look for it in my upcoming What’s In The Bag post). The process was unbelievable, quick, and I could not envision it running any smoother than it did. Thanks, Delila!
Turnaround: 9
Design(s): 10
Quality: 9
Communication: 10
Price: 7
Customization: 10
Overall: 9